The Snipping Tool is an incredibly useful feature that allows users to capture and edit screenshots effortlessly. Whether you're using a Windows PC or a Mac, learning how to snip, capture, and save your screen efficiently is essential. This guide will cover everything you need to know about using the Snipping Tool on Windows, its equivalent on Mac, and how to crop, save, and manage your screenshots.
1. What Is the Snipping Tool?
The Snipping Tool is a built-in screenshot utility in Windows that allows users to capture specific portions of the screen, windows, or full screen. It provides editing tools for annotating and saving screenshots quickly.2. How to Use the Snipping Tool on Windows
Using the Snipping Tool on Windows is simple. Here's a step-by-step guide:- Open the Snipping Tool:
- Search for "Snipping Tool" in the Windows search bar and click to open it.
- Choose Your Snip Mode:
- Rectangular Snip: Capture a rectangular portion of the screen.
- Free-form Snip: Draw a free-form shape to capture.
- Window Snip: Capture the entire window.
- Full-screen Snip: Capture the entire screen.
- Take a Screenshot:
- Click "New" to start snipping. Use your mouse to select the area you want to capture.
- Save and Edit:
- Once the snip is captured, you can annotate it using the pen, highlighter, or eraser tools. Save it by clicking the "Save" button or pressing Ctrl + S.
3. Snipping Tool Keyboard Shortcut for Windows
You can quickly access the Snipping Tool using the following keyboard shortcut:- Windows + Shift + S: This will open a quick snipping toolbar where you can select your snip mode and take a screenshot without opening the full Snipping Tool application.
4. How to Snip on a Mac
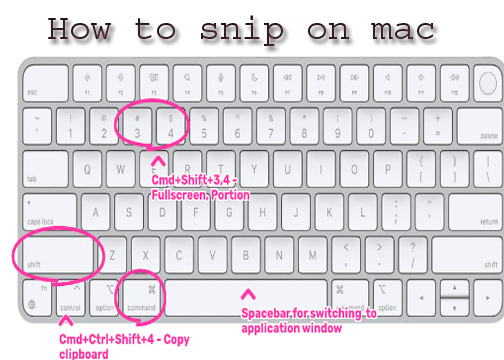
Macs don’t have a built-in Snipping Tool like Windows, but they offer powerful screenshot capabilities through keyboard shortcuts. Here's how you can snip or capture the screen on a Mac:- Capture a Specific Area:
- Press Command (⌘) + Shift + 4. Your cursor will change to a crosshair. Click and drag to select the portion of the screen you want to capture.
- Capture the Entire Screen:
- Press Command (⌘) + Shift + 3 to capture the entire screen.
- Capture a Specific Window:
- Press Command (⌘) + Shift + 4, then press the Spacebar. This will change your cursor to a camera icon. Click on the window you want to capture.
5. Snipping Tool for Mac: Copy and Paste
After taking a screenshot on your Mac, it will automatically be saved to your desktop. To copy and paste your snip:- After taking the screenshot (using the Command + Shift + 4 or Command + Shift + 3 shortcuts), the image will appear as a thumbnail in the bottom-right corner of your screen.
- Click on the thumbnail to open it, then press Command + C to copy the image.
- You can then paste the screenshot wherever needed by pressing Command + V in the desired location.
6. How to Screenshot on a Mac
As mentioned earlier, Mac users have several ways to take screenshots using keyboard shortcuts:- Command + Shift + 3: Capture the entire screen.
- Command + Shift + 4: Capture a selected portion of the screen.
- Command + Shift + 4, then Spacebar: Capture a specific window.
7. Snipping Tool Mac: Keyboard Shortcut
Mac doesn't have a tool called "Snipping Tool," but it has screenshot shortcuts:- Command + Shift + 4: Capture a selected portion of the screen.
- Command + Shift + 3: Capture the entire screen.
- Command + Shift + 5: Opens the screenshot toolbar with options for capturing windows, the entire screen, or a selected portion.
8. Snipping Tool for Mac: Free Download
Macs come equipped with excellent screenshot features, so you don’t need to download additional software for basic snipping. However, if you’re looking for third-party alternatives, here are a few free snipping tools for Mac:- Lightshot: A free and easy-to-use screenshot tool with annotation features.
- Monosnap: Allows for more advanced screenshots, annotations, and cloud storage.
- Greenshot: Another free snipping tool with additional features for sharing and editing screenshots.
9. How to Screenshot on MacBook Air
The process for taking a screenshot on a MacBook Air is the same as any other Mac device:- Command + Shift + 3: Capture the full screen.
- Command + Shift + 4: Select and capture a portion of the screen.
- Command + Shift + 4, then Spacebar: Capture a specific window.
10. How to Crop a Screenshot on Mac
After taking a screenshot, you can crop it directly on your Mac without the need for additional tools:- Take your screenshot (using the above shortcuts).
- Open the screenshot from your desktop or recent files.
- Click the Edit button (it looks like a pencil) in the top-right corner.
- Use the crop tool to adjust the size of the image and remove any unnecessary parts.
- Save the edited image.
11. Snipping Tool for Mac: Where Does It Save?
When you take a screenshot on a Mac, by default, the images are saved to your desktop. The files are automatically named with the word "Screenshot" followed by the date and time the image was taken. If you want to change where screenshots are saved:- Press Command + Shift + 5 to open the screenshot toolbar.
- Click Options.
- From the drop-down menu, you can select where to save your screenshots, including your desktop, a folder, or other locations.
